An InRoads user asked for Mark's help with this problem he was having :
Hi Mark,
I have a quick question; I am going to be provided an Excel spreadsheet with VPI Stations and VPI elevations. Is there an easy way to import this data into InRoads to create a vertical alignment?
Thanks... JR

Here is the Zen Dude's response:
Hi JR!
Regarding the vertical alignment & Excel spreadsheet, yes, as follows:
1) Create your horizontal alignment and set it Active
2) Check the formatting of the vertical spreadsheet information. It doesn't matter what extra information is in there, just as long as you have the Station and Elevation somewhere in there.

3) In Excel, save the spreadsheet as a comma delimited (CSV) file. After you save it, you can keep the extension as CSV or just rename it to TXT, it doesn't really matter at that point. (This pic is from Excel ... Save As.)

4) Go to InRoads > File > Text Import Wizard and set the Data Type to Vertical Alignment, and then browse to the File Name at the bottom.

5) Then click OK to move into the wizard. The wizard has a varying number of steps depending on the Data Type being imported. The Vertical Alignment import has 4 steps. In Step 1 you define the start & stop lines for the import. Of course headers are not imported so if you have one, then start a row down. You can right-click on the row where you want to start the import. Then Next >

6) Step 2 gets a bit more detailed regarding the exact lines that you want to import if you have a more complex file. The file formatting is also defined on this step ... Delimited. Then Next >
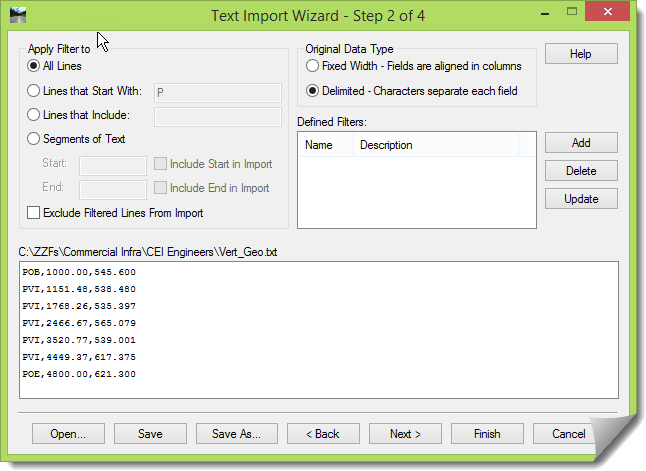
7) Step 3 defines the exact Delimiter that is used in the file. Then Next >

8) The last step, defines the headers on the columns that are in the file. Just Skip the columns that you don't care about, and assign the appropriate header to the ones that you need. It might be nice if this tool could read your personal headers from the spreadsheet but it can't. You can also set the Geometry Style here or later, in the next dialog box.

9) After this information is defined you can Save it into the XIN for later. That way you don't have to recreate it. This is really good if you tend to have similar files that need imported. If you do save it, I usually enhance the auto-Description to make it more complete so when I see it later I'll remember exactly what it's for. Then Finish.

10)Once you Finish the wizard, the final dialog box pops up with the last bits of information. Enter the Name of the vertical alignment, a Description and Style (if it wasn't defined in Step 4). Then OK to import it into your geometry project. You'll also get a verification notice that it actually did it.


11)Verify that it's now stored under your Active Horizontal.

12)And then you can display it into any profile windows that you might have created from that horizontal. Always double check that it came in per the input file.

13)And just to wrap this up. After creating the Wizard (TIW) and saving it in the XIN, you can just select it, and then the file, and off you go... no more need to walk through the wizard again.

I hope this helped.
Civilly yours,
-zen
 Mark is not only a good teacher, but a good designer as well. Mark is both knowledgeable and clear in both the InRoads software and in the area of Road Design at ITD. He provides good and direct answers to questions and assists in developing solutions in the design process. He is a uniquely qualified individual.


